I have a toddler. His best friends are the ones with tents. I am not a fan of cheesy looking kids toys, accessories etc, as decor in my home. Nothing screams beautiful family room like mountains of obnoxious colorful kids toys. I am really not this annoying about toys but I really wanted to have a kids tent that could sit out, be cute and not feel like I was at the circus! I found this family's blog who made these awesome homemade tents. I used their template and made my little guy a homemade tent for just $18!
The tent is a hit! Photo finish on the inside and now our new favorite book reading spot!
Showing posts with label Projects. Show all posts
Saturday, April 5, 2014
Saturday, January 11, 2014
Phase 1: Unfinish Basement Project
As for phase 1 of my making my unfinished basement pretty, I organized the junk and painted a mural wall.I heart birch trees and I really wanted them on wallpaper in my house somewhere. However, I never found one that I liked. As, I was searching for inspiration for our basement I came acrossed this idea from a blog and just had to do it! I grabbed 4 cans of leftover paint and mixed them until I had about 3/4 gallon. I used the white already on the walls for the trees and free handed the rest using the lady's picture from her blog as a guide. If you count a few foam brushes I bought, a bucket to mix my paint and new light bulbs then this project cost about $8 and an a few hours. Love it!
before pictures
Labels:
Before and After,
Projects,
Residential Design,
Sawyer Home
Friday, January 10, 2014
Unfinished Basement Project
My current basement is a dirty catch all. However, it does contain our laundry area and every day or so I have to slip on shoes and make my sad way down there. During our flip of this house last year we did replace the basement wall with 1/2 our budget for the flip, so the basement, I suppose was an investment already, why not make it pretty, right? Our basement does have potential. We have no desire to finish the walls or floor, which would have no return on our investment in this house, so we are gonna at least make it so I don't have to put my shoes on to go down there out of fear of the unknown. So the budget for this space will be almost nonexistent. But I'm gonna make it awesome!
Perks in our basement do include a few things, like an open space, it's warm and it has high ceilings. I would like to create a pretty and clean space to do our laundry comfortably, with a corner for storage, and a craft space. Plus, an open strip for my toddler to ride his bike. I plan to make a dynamic space through paint and a mural wall. I also, want to figure out something for the floor. Since its winter and coming up busy season for my accountant hubby, this project will take some time. But I quickly snapped a few candid, SERIOUSLY CANDID, photos of the basement before I get started. She may have cleaned up if she knew you would be taking pictures of her. Beware...
The ceiling is white. The bank painted it because of the mold. But hey, ill take it it makes the ceiling look even taller!
Would you want to do laundry here?
Yes, we have two sets of washer and dryers. Do you want these ones?
The uglyist color of stairs ever! Those will be painted.
Yes, most of this pile is baby stuff!!!!!
Project Phases
1) Phase 1: Organize junk and paint wall mural: Complete
Perks in our basement do include a few things, like an open space, it's warm and it has high ceilings. I would like to create a pretty and clean space to do our laundry comfortably, with a corner for storage, and a craft space. Plus, an open strip for my toddler to ride his bike. I plan to make a dynamic space through paint and a mural wall. I also, want to figure out something for the floor. Since its winter and coming up busy season for my accountant hubby, this project will take some time. But I quickly snapped a few candid, SERIOUSLY CANDID, photos of the basement before I get started. She may have cleaned up if she knew you would be taking pictures of her. Beware...
The ceiling is white. The bank painted it because of the mold. But hey, ill take it it makes the ceiling look even taller!
Would you want to do laundry here?
Yes, we have two sets of washer and dryers. Do you want these ones?
The uglyist color of stairs ever! Those will be painted.
Yes, most of this pile is baby stuff!!!!!
Project Phases
1) Phase 1: Organize junk and paint wall mural: Complete
Thursday, April 12, 2012
Creating Faux Tiles
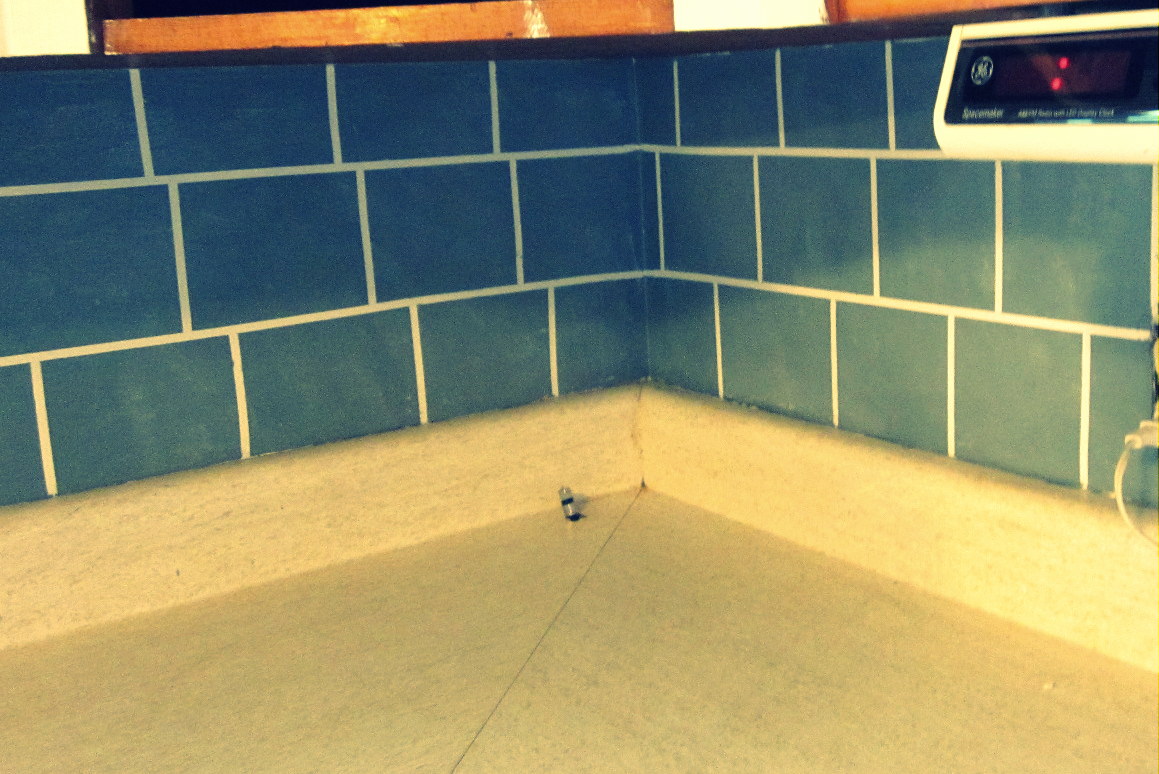
Last fall my mom wanted to do a small kitchen update. Along with painting the cabinets white, changing the cabinet hardware, getting new accessories, we also created faux tiles as a back-splash to bring interest to the kitchen. To create the faux tiles; I found a 1/8th inch thick painters tape. We created grout lines using the tape and painted over the area with the same color as the walls. We also used a little white paint to add texture to the tiles. When we released the tape a faux tile appeared. It turned out great!
To my surprise, I was looking at the latest addition of This Old House magazine and I saw a project for faux tiles. In 5 steps they showed you how to inexpensively update your walls creating faux tiles. I felt so proud, to have been ahead of game in this design idea.
This is an awesome project!!! You should try it!
Saturday, February 4, 2012
William Vaughan Company 2012- Sneak Peak
I have been working on my first commercial project for the William Vaughan Company in Maumee. The project started in October and is coming to a close this month. They are an accounting firm and the 20 year old building needed a complete update. This has been a very fun and exciting project! Here is a sneak peak of two of the spaces. Note they aren't completely staged and finished.
Here is a before and after of the entrance of the building. Before the client wanted to get rid of these gross fake plants and old patched tiles (that had problem with cracking.) The contractors came into a lot of problems in this space. They had to tear out all the floors, planters, and sub-floor. It was patchy work that had water problems. They added a new sub-floor, this beautiful lime stone cobblestone pattern tile, new paint job and a heater. When we stage this space it will included a water feature and some real plants! It is way more grand than before!
This isn't a space but still a design feature. The old name tag dated the building and didn't fit with the update. We ordered new modern name plates. They update the building and are also very easy to change unlike the older ones!
Wednesday, September 7, 2011
Coffee Filter Lamp Shade
I wasn't completely sold on my lampshade I made for my "lamp revamp." http://designsbyalexandria.blogspot.com/2011/08/lamp-revamp.html I felt that the shade was not full enough for the lamp --the proportions were off. So, I found this super creative and thrifty way to make my shade fuller and give it more character with coffee filters! I folded the filters and hot glued them to the shade. It was time consuming but so easy and fun!
| Before |
| During |
| After |
Thursday, August 18, 2011
Fabric Art
I always enjoy exploring new ways of creating one-of-a-kind art in my home. Actually, everything that is on my walls, is something that I have made. I believe that homemade art, whatever your taste may be, is one of the best accessories in a home. This months newsletter was about created character in the home, through the walls. One-of-a-kind art is truly character. Here is a piece that I just finished.
Tuesday, August 2, 2011
My Re-purposed Chair
Re-purposing is a general concept that is used in furniture design. Re-purposing antique furniture is something that is very popular right now in design because it also supports the Green movement. The process is much like redecorated a room, you keep the bones(architecture) of the room highlighted but change the interior around it. Re-purposing furniture is the same concept, you keep the bones of the furniture but give it a facelift. Re-purposing is a cheep way to create a one-of-a-kind piece of furniture that looks like you paid hundreds for it.
I have had my heart set for a long time on re-purposing an old armchair and making it into a vintage desk chair. This past week I got my opportunity. On the side of the road was an old dirty dirty armchair, with a $5 sticker. I knew I had to have it and loaded the chair and slipped my $5 into the mailbox. On the entire ride home I couldn't believe what I just found! As I researched the history of the chair, I didn't find much. I studied furniture in college but nothing about this chair stuck out except for the spring cushion with straw/hay stuffing (which made a massive mess). Spring cushions were popular in 1920's furniture design. Visually, one thing that sticks out that doesn't necessarily identify the style of the chair, is the stretcher at the bottom. The stretcher is what connects the front legs to the back and also runs across the middle making an "H" shape. As you see the middle stretcher is very detailed and makes the chair very distinctive. I also know that this chair was meant to be upholstered. When I striped the chair down the only wood that was detailed, treated, stained and lacquered was what is exposed now in the picture to the right.
1) I ripped off all the old and dirty upholstery. Inside the cushion was a mixture of cotton stuffing and straw/hay. I assume since the cushion had a spring base that the mixture of straw/hay and the thick cotton was important. Today upholstery is stapled in but this chair shows its date by the hundreds of nails that held the fabric in place.
2) I patiently, for hours, pulled out all the nails that were stuck in the wood. Around the nails were pieces of fabric that needed removed. From exposing that inside of the chair I could tell that the chair had been reupholstered at least once. Being reupholstered twice meant, twice as many holes!
3) I gave the chair a good washin'. It was clear that this chair hadn't been used in years and was sitting in a garage or a deep corner in the basement. I used wood soap to clean and scrub the chair.
4) I filled in all the holes with wood fill. This was important because I wasn't going to reupholster the chair but add a foam cushion.
5) After letting the wood fill sit over night, I sanded the entire chair. I had plans to paint the chair, so I had to make sure I sanded off any left over lacquer that once was on the chair.
6) After the chair was completely sanded, I dusted it. After sanding the chair it accumulated a lot of dust. It is important that there is no dust on the surface of the chair, so the paint stays clean and sticks.
7) I spray painted the spring cushion. Since I wasn't going to upholster it, I knew the spring cushion would show at the bottom of the chair. I spray painted the entire spring cushion white with a can that I had left over.
8) The next step should have been to prime the chair. I had half a quart of semi-gloss white paint. I knew that I had enough to do several coats, so primer wasn't that big of deal. I painted the chair completely white. After several coats it looked shinny and fabulous.
9) I put a shellac finish on the chair. I had a leftover can of shellac from a former wood project. I had just enough shellac to cover the entire chair. This finished and sealed the paint. This will protect the chair and give it a finished look.
10) I created a cushion template. Using a piece of poster board, I sat it on top of the spring cushion and traced the seat of the chair. After tracing the seat, I cut of the shape and had a template for my foam cushion.
11) I created the cushion. I bought a 24X24X2 inch piece of foam. I used the template, traced the shape on the foam and cut the foam to size.
12) I made a cover for the cushion. I bough a yard of heavy duty fabric. I do not sew but with ironing tape I created a pocket for the foam cushion to slide into.
13) I finally put the chair together! It turned out way better then I thought. I purchased the chair for $5, bought wood fill for $3, and the foam, ironing tape and fabric was $30. Everything else I had. This chair only cost me $38 to make! The chair is very sturdy, comfortable and sits great.
I have had my heart set for a long time on re-purposing an old armchair and making it into a vintage desk chair. This past week I got my opportunity. On the side of the road was an old dirty dirty armchair, with a $5 sticker. I knew I had to have it and loaded the chair and slipped my $5 into the mailbox. On the entire ride home I couldn't believe what I just found! As I researched the history of the chair, I didn't find much. I studied furniture in college but nothing about this chair stuck out except for the spring cushion with straw/hay stuffing (which made a massive mess). Spring cushions were popular in 1920's furniture design. Visually, one thing that sticks out that doesn't necessarily identify the style of the chair, is the stretcher at the bottom. The stretcher is what connects the front legs to the back and also runs across the middle making an "H" shape. As you see the middle stretcher is very detailed and makes the chair very distinctive. I also know that this chair was meant to be upholstered. When I striped the chair down the only wood that was detailed, treated, stained and lacquered was what is exposed now in the picture to the right.
The steps to re-purposing this chair
2) I patiently, for hours, pulled out all the nails that were stuck in the wood. Around the nails were pieces of fabric that needed removed. From exposing that inside of the chair I could tell that the chair had been reupholstered at least once. Being reupholstered twice meant, twice as many holes!
3) I gave the chair a good washin'. It was clear that this chair hadn't been used in years and was sitting in a garage or a deep corner in the basement. I used wood soap to clean and scrub the chair.
4) I filled in all the holes with wood fill. This was important because I wasn't going to reupholster the chair but add a foam cushion.
6) After the chair was completely sanded, I dusted it. After sanding the chair it accumulated a lot of dust. It is important that there is no dust on the surface of the chair, so the paint stays clean and sticks.
7) I spray painted the spring cushion. Since I wasn't going to upholster it, I knew the spring cushion would show at the bottom of the chair. I spray painted the entire spring cushion white with a can that I had left over.
8) The next step should have been to prime the chair. I had half a quart of semi-gloss white paint. I knew that I had enough to do several coats, so primer wasn't that big of deal. I painted the chair completely white. After several coats it looked shinny and fabulous.
9) I put a shellac finish on the chair. I had a leftover can of shellac from a former wood project. I had just enough shellac to cover the entire chair. This finished and sealed the paint. This will protect the chair and give it a finished look.
11) I created the cushion. I bought a 24X24X2 inch piece of foam. I used the template, traced the shape on the foam and cut the foam to size.
12) I made a cover for the cushion. I bough a yard of heavy duty fabric. I do not sew but with ironing tape I created a pocket for the foam cushion to slide into.
13) I finally put the chair together! It turned out way better then I thought. I purchased the chair for $5, bought wood fill for $3, and the foam, ironing tape and fabric was $30. Everything else I had. This chair only cost me $38 to make! The chair is very sturdy, comfortable and sits great.
Subscribe to:
Posts (Atom)